In this post I’m going to show you how you can use curves in photoshop to adjust contrast in images.
Hey there! My name is Scott and on this blog I post mini tutorials like this one on Photoshop, Premiere Pro, and tips for Freelancing. So please do consider following this blog by clicking on the follow box at the top right of this page. Ok, let’s get right into how we can use curves to adjust contrast with our images…
Image > Adjustments > Curves (Command M)
There’s two ways you can bring up the curves window in Photoshop. First you can go up to Image, adjustments, and then celect curves or you can hit command M as a keyboard shortcut to bring up the window. I like to have curves as an adjustment layer, and to add that you just go to layer, new adjustment layer, curves.
Curves Adjustment Layer
The reason why I prefer an adjustment layer with curves over simply using the curves window is because you have more control of turning on and off the curves layer if you need to. Without the adjustment layer, you’re basically applying curves to the entire image with no way to turn it on or off if you need to.
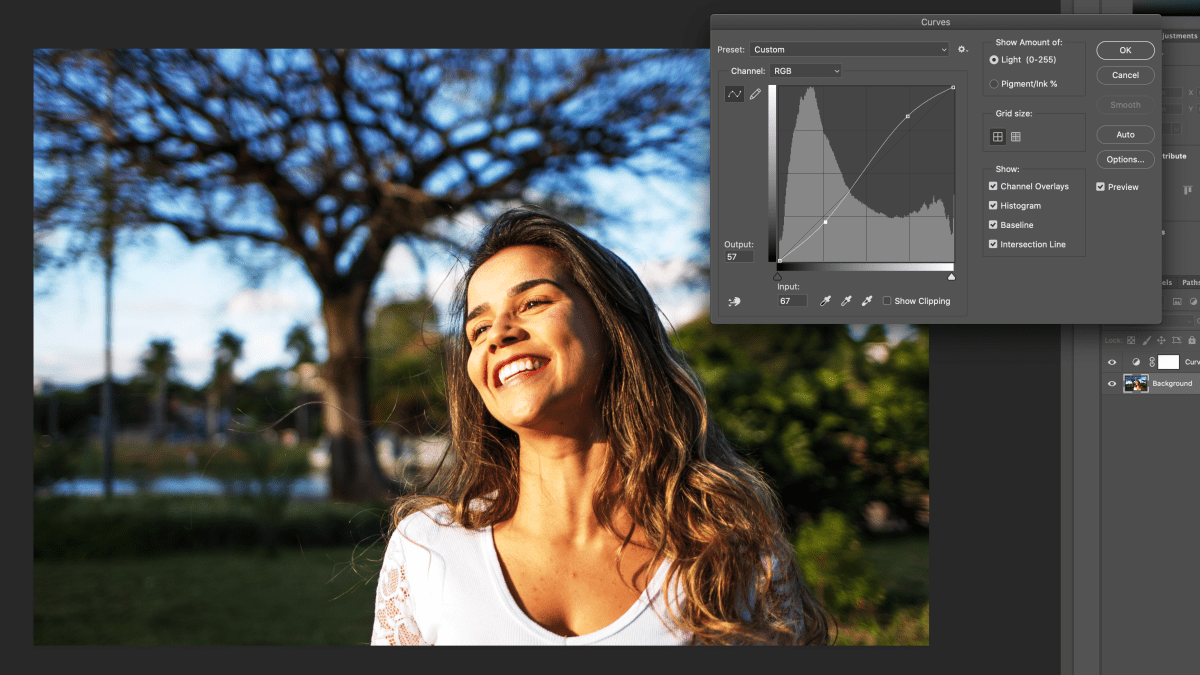
Click anywhere on the line to create a point
To start using the curves layer, you can click on anyone point on a diagonal line which will add a point. From there you can pull that point up or down to increase or decrease the contrast in the image. So by pulling the point lower, it makes the image darker, by pulling it upwards it makes it brighter. Now, depending on where you put your point on this line can darken or brighten certain parts of the image.
S Curve will create more contrast
For example you can create what’s call an S curve, by placing points at the bottom and top of the line and pulling the line to create an S shaped curve. The wider the S curve, the more contrast you’re going to get in the image. You can also try inverting the S curve, and play around with that if that makes more sense for your image. If you make a mistake or you don’t like where you’ve place the points, you can select a point, and hit delete to get rid of it and that will bring the line back to its original diagonal shape.
Pulling Darks and Lights
There’s really three things to remember when adjusting curves, the further you pull the line upwards the lighter the image will get, the further downward the darker it will get. And if you keep everything flat and centered, the image will appear completely grey. If you were to make the line completely vertical, you’d get an image that’s super contrasted, with blown out lights, and super dark shadows.
Auto curves and presets
There’s preset curve settings that you can play around with if you like. There’s color negative, cross process, darker, increased contrast, lighter, linear contrast, medium contrast, negative, and strong contrast. There’s also auto contrast, which Photoshop will analyze the image and create an automated curves adjustment for the image. What Photoshop does is usually not too bad, especially if you’re in a hurry and just want to quickly add some contrast to an image. However, I usually like to spend some time tweaking the curves to get it just right for my own images. If you make a mistake or you don’t changes that you’ve applied, you can always go back up to default and that will restore the image to it’s original state.
RGB curves
There’s also the RGB curves where you can adjust the color tones of Red, Green, or Blue. Now, the opposite of RGB is CMY or Cyan Magenta Yellow, so you can pull the red line upwards to get more of a red look or the opposite to get Cyan. Next, you can do the same with green, to either get more of a green tone or get magenta. And then we have Blue, or Yellow depending on what tone you’d prefer.
Finger scrub tool
There’s also a few options on the side of the curves graph here. The first one is the finger scrub tool, and what this does is, it allows you to pinpoint an area on the image that you want to adjust curves for. So you can hover any point on the image, and if you look over at the curves graph you’ll see the line moves to wherever your mouse cursor is over the image. If you select a part of the image, it will make a point and from there you can adjust the curves on that exact spot of the image.
Sample Image Points
Next you can sample parts of the image that are black, grey, or white. You can do that by using the three eye dropper icons, and clicking on a point in the image. That you can sort of manually tell photoshop what parts of the image or white, grey, or black. Be careful though, if you were to use the white eyedropper for example and select the darkest part of the image, it would turn the image completely white. The same would happen in reverse, if you selected the black eyedropper and selected the lightest part of the image.
Draw curves points
This next feature is kind of a fun one, you can actually draw a curved line by selecting the pencil icon. If I draw a squiggly line here, it kind of creates this video game look to the image. Which is cool if that’s the effect you’re going for, I’m not sure what else this could be used for. Then if you select the line icon above the pencil, it will turn all of the draw points into actual curve points that you can start to adjust.
Ok so that’s it for curves, what part of curves was your guys favorite feature? Was it the RGB adjustments, or maybe some of the presets? Let me know in the comments below. If you’ve enjoyed this post, please do hit the like button and feel free to share with anyone who might also enjoy it.
For more information please check out my YouTube page at youtube.com/scottedwardfowler and follow me on twitter @scottEfowler. I’ve also posted my other tutorials on Photoshop at the top of this page, so check those out as well! Alright that’s it from me guys, see you in the next post!
